
SIZE GUIDE CLOTHING

SIZE GUIDE CLOTHING
SIZE GUIDE BRAS
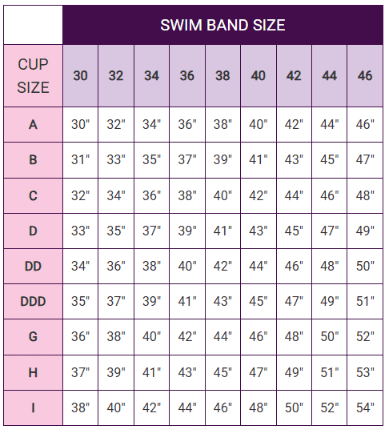
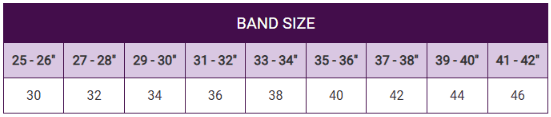
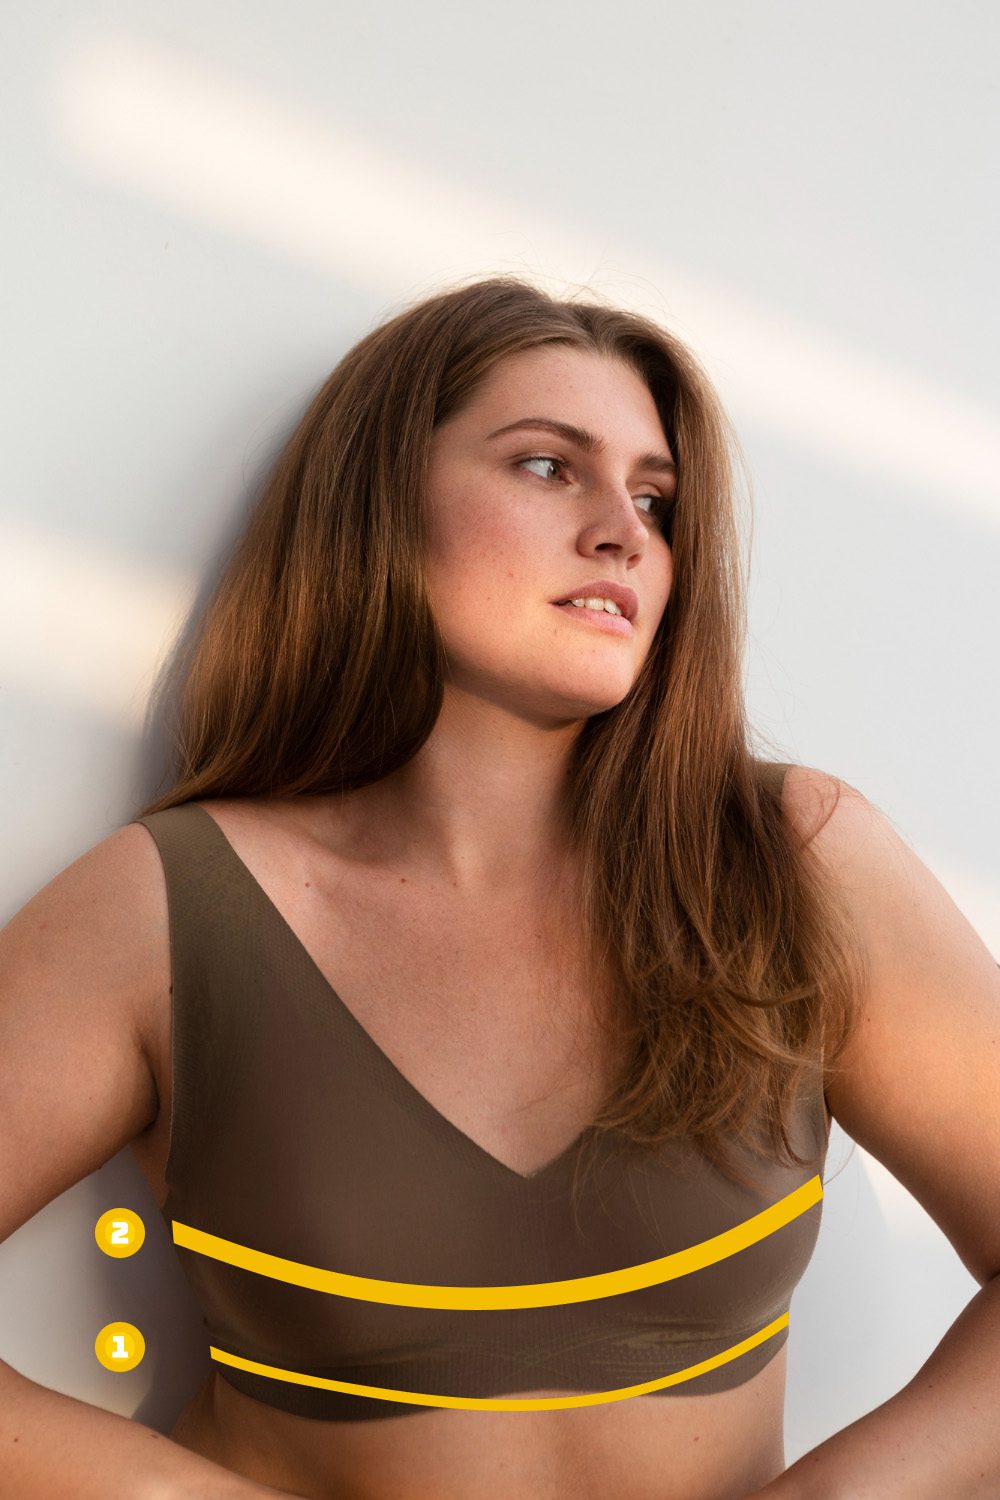
STEP 1: Identifying the correct band size
Step 1: Determine Your Band Size
Pro Tip: Enlist a friend’s assistance for the most accurate measurement.
- Position the measuring tape just beneath the underband of your bra, directly under your bust.
- Wrap the tape snugly around your torso, ensuring it lies flat against your skin and remains parallel to the floor across your back and underbust.
- Record your measurement in inches. Refer to the size chart provided to identify your band size.
Example: A measurement between 31” and 32” corresponds to a band size of 36.
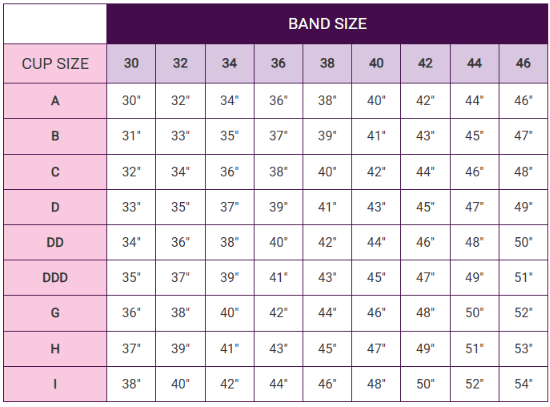
STEP 2: Identifying the correct cup size
Step 2:
Find Your Cup Size Pro Tip: Wear a non-padded bra for the most accurate results—this helps avoid adding extra volume to your measurement. Measure around the fullest part of your bust , keeping the tape parallel to the floor. It should sit snugly but not dig in or feel restrictive. Check alignment : Ensure the tape stays straight across your back, just like your bra band. Record your bust measurement in inches. Cross-reference this number with your band size (from Step 1) on the size chart to determine your cup size.
Example: If your band size is 36 and your bust measures 38” , look at the 36 row on the chart and find where 38” falls. In this case, it lands on C , making your bra size 36C .
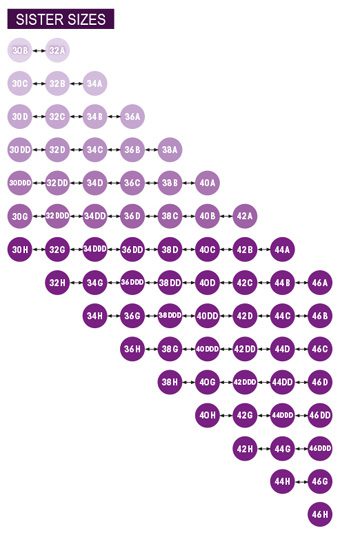
Step 3: Discover Your “Sister Sizes” for a Perfect Fit
Think of sister sizes as your bra’s closest relatives—they share the same cup volume but offer different band options, like a tailored dance partner for your body. If your go-to size almost works but needs a tweak, these alternatives can save the day.
Here’s the scoop:
- If the band feels snug (or you’re always using the loosest hook), bump up the band size by 1 and drop the cup size by 1 .
Example: A 36C becomes 38B for a comfier band. - If the band feels loose (or you’re hooked on the tightest setting), shrink the band by 1 and boost the cup size by 1 .
Example: A 36C becomes 34D for a snugger fit.
How to find them:
- Grab your original size (like 36C) and glance at the size chart.
- Slide left or right by one column to explore your sister sizes.
Why it works: Sister sizes keep the same overall cup volume while adjusting the band’s snugness. It’s like swapping a belt notch without changing the outfit!
Remember: Fit is personal. If you’re between sizes, lean into what feels best—your comfort always comes first.
P.S. Your bra should feel like a hug, not a handshake. Adjust freely! 🌟
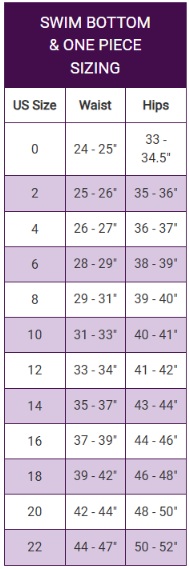
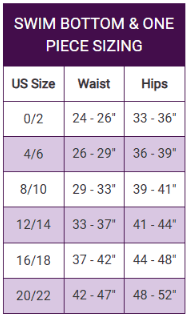
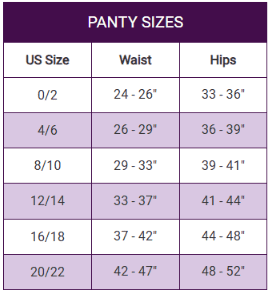
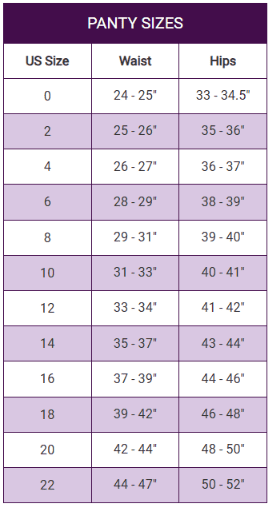
SIZE GUIDE PANTIES
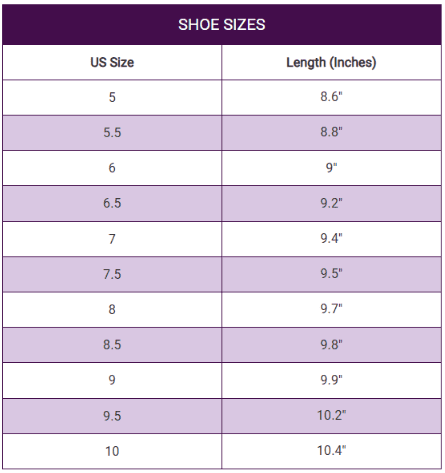
SIZE GUIDE SHOES

How to Measure
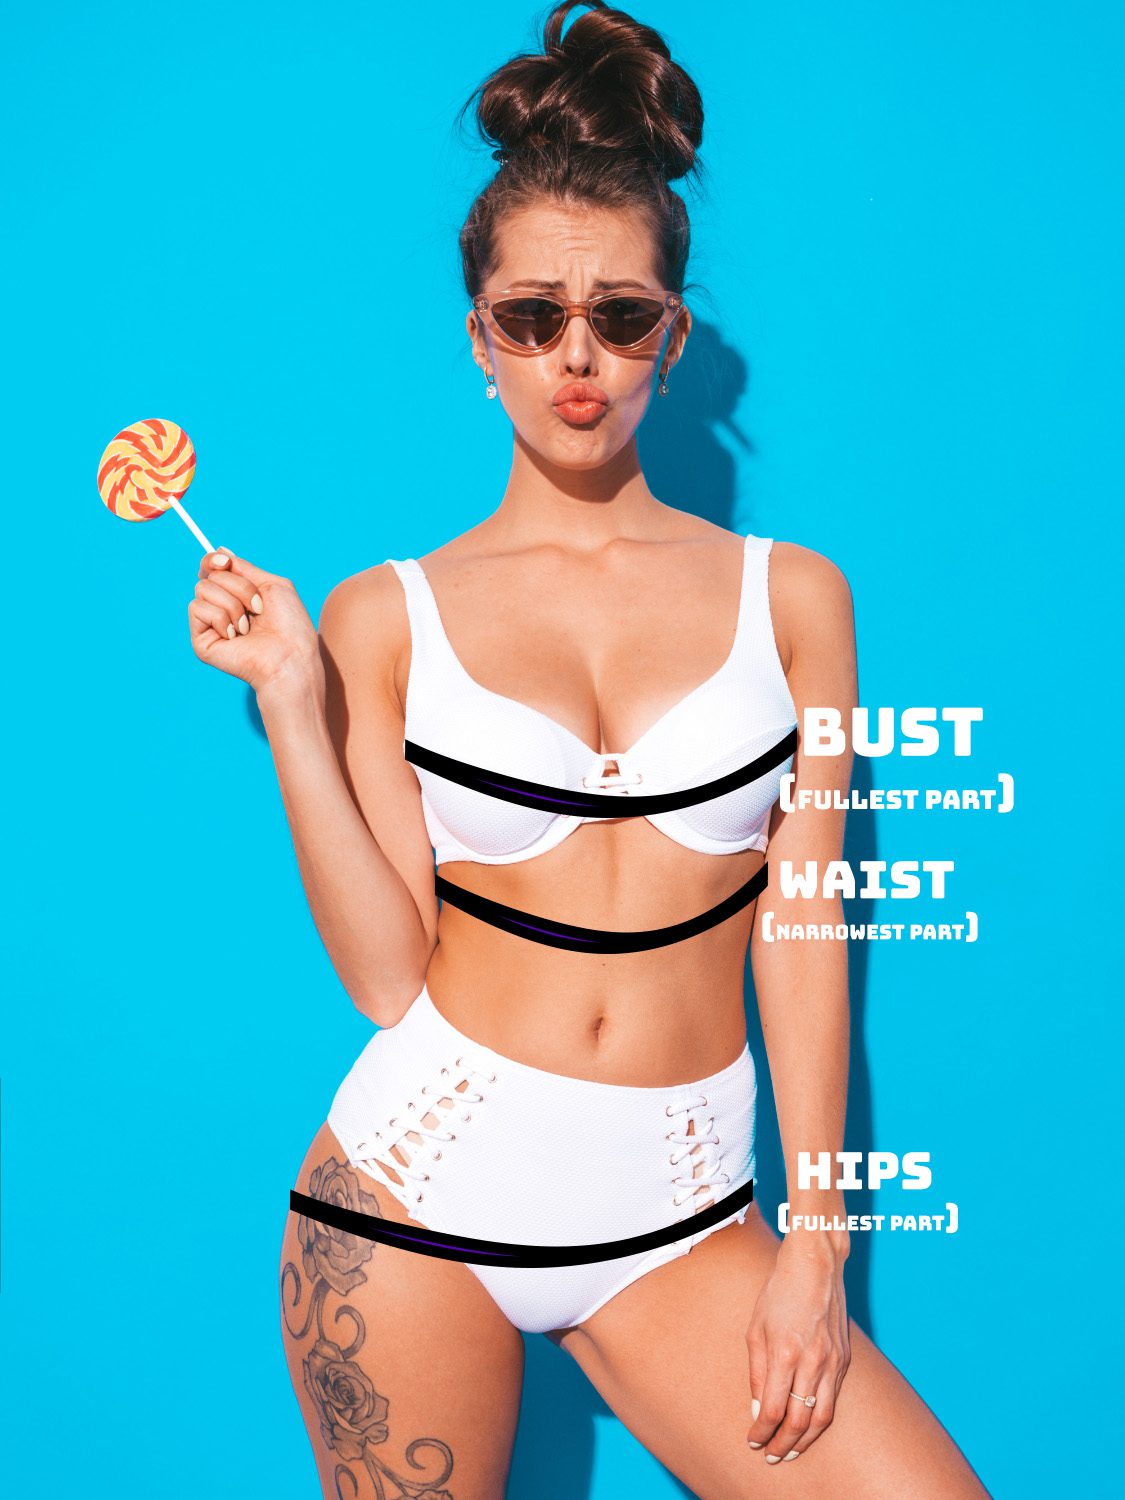
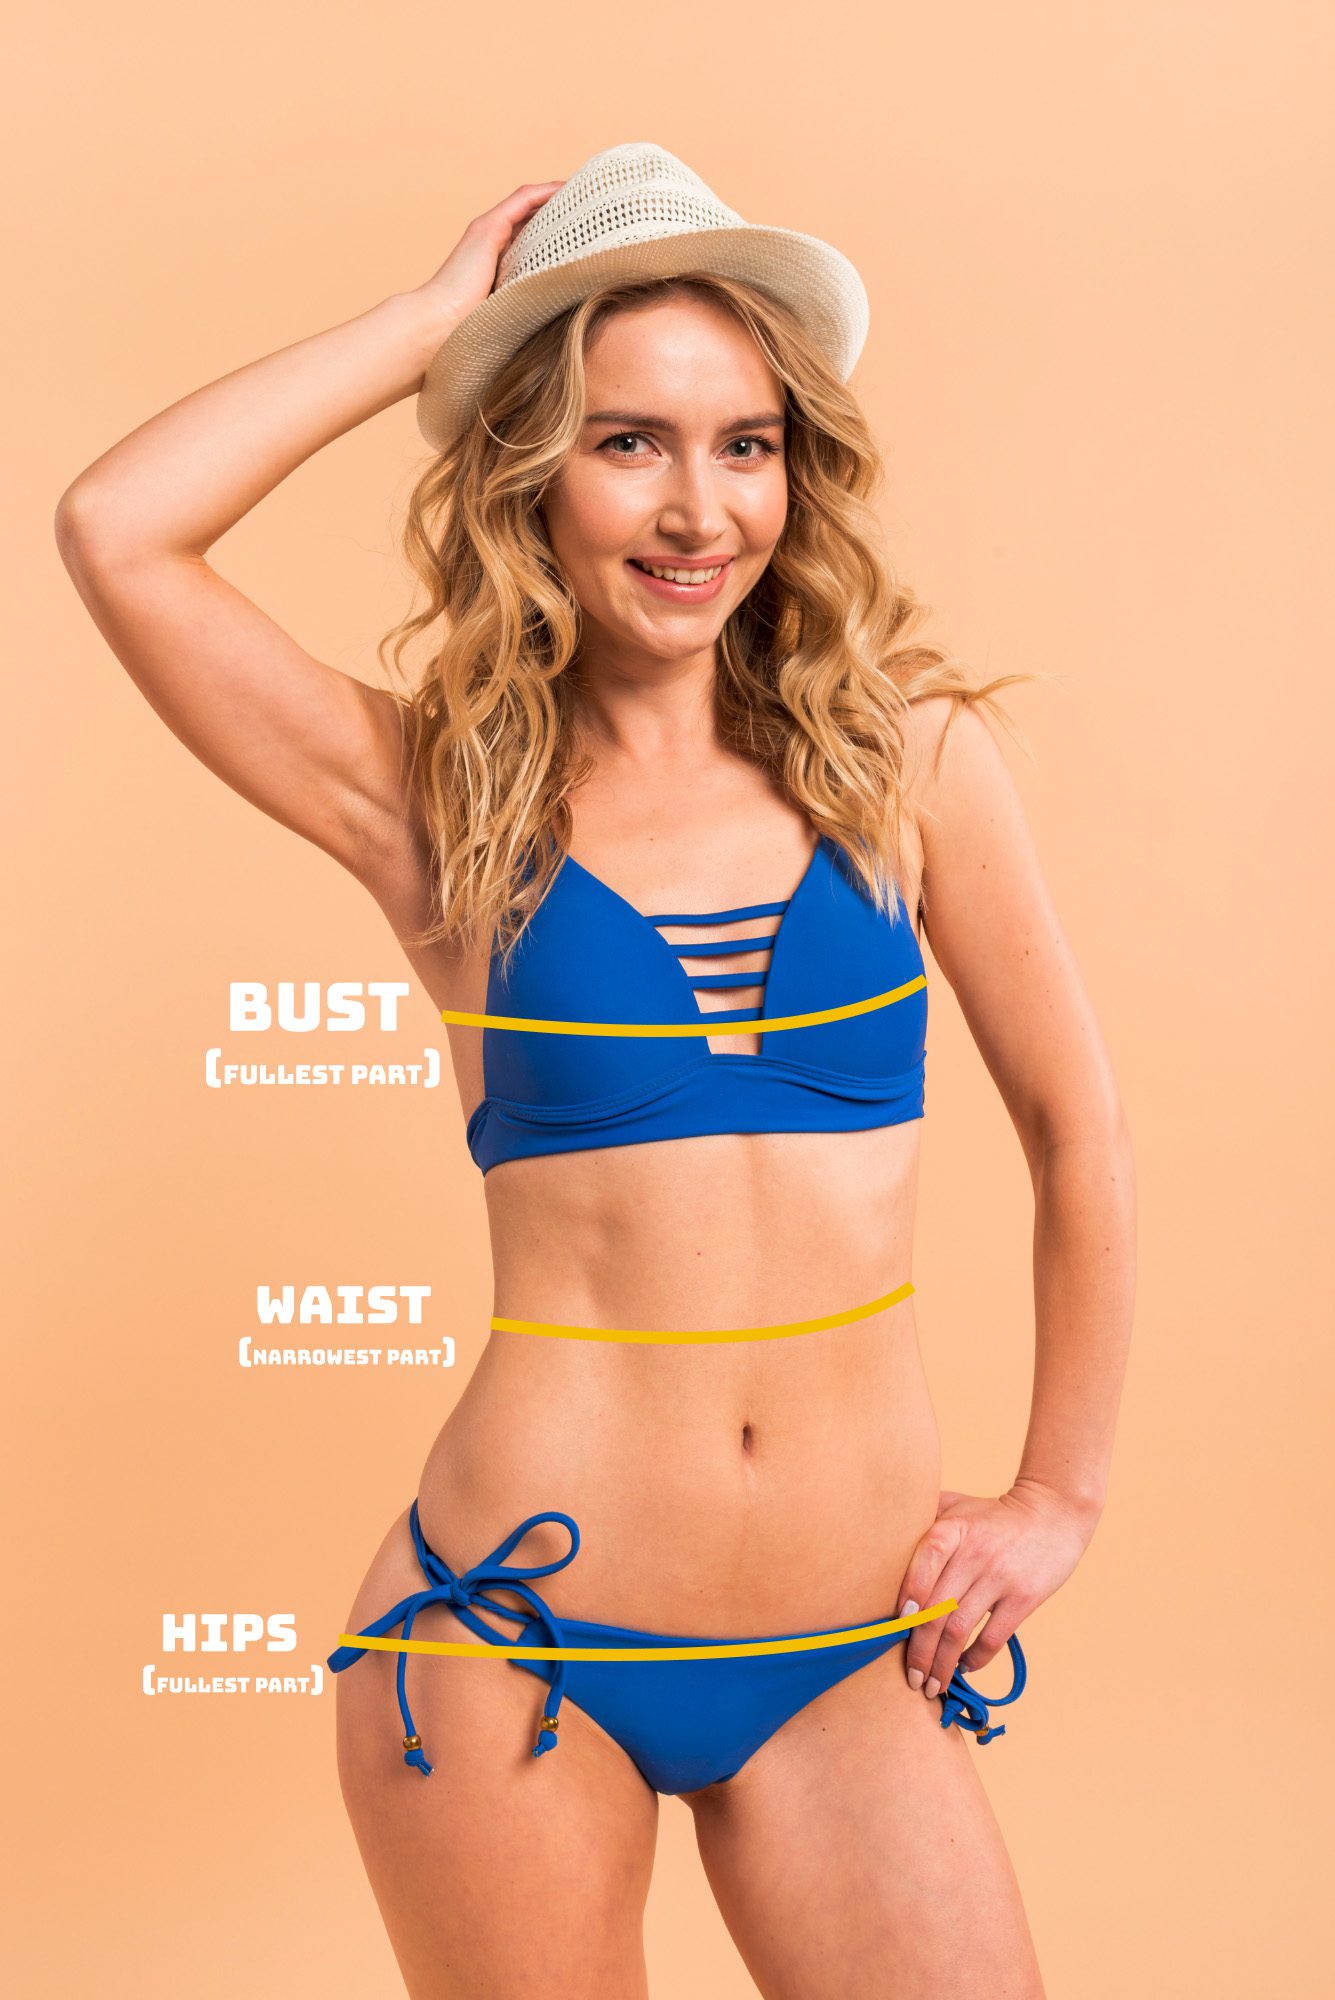
Bust
To measure your bust, start by preparing properly to ensure accuracy. Wear a comfortable, well-fitting bra, as this will shape your bust and provide a more reliable measurement than measuring without one. Stand up straight with your arms relaxed naturally at your sides. Take a flexible measuring tape and wrap it around the fullest part of your bust—this is typically across the chest at the level of your nipples, but it may vary slightly depending on your body shape. Make sure the tape is parallel to the floor all the way around your body and fits snugly against your skin without digging in or feeling constrictive. Avoid pulling it too tight, as this can distort the measurement. Once the tape is in place, take note of the measurement in either inches or centimeters, depending on your preference or the system used by the clothing brand.
Waist
For the waist measurement, the original guide suggests measuring 42cm (16.5 inches) down from the nape of the neck, which may apply to specific garments like dresses or jumpsuits. However, for a more universally applicable approach, it’s better to measure at your natural waistline. To find this, stand straight and bend slightly to one side—the crease that forms on your torso marks your natural waistline, typically the narrowest part, located just above your belly button. Once you’ve identified this spot, wrap the measuring tape around your waist, keeping it level with the floor and snug against your body. Don’t suck in your stomach or hold your breath, as this can lead to an inaccurate, smaller measurement. If you’re following the original instruction for a specific purpose (e.g., a garment with a defined waist point), start at the nape of your neck (the bony bump at the base of your neck) and measure straight down 42cm (16.5 inches) along your front, then wrap the tape horizontally around your body at that point. Record the measurement in inches or centimeters.
Hips
To measure your hips, begin by standing with your feet together to keep your posture even. The original guide instructs measuring 20cm (8 inches) down from your waistline, which can be a helpful starting point, but for a general measurement, you’ll want to focus on the fullest part of your hips and buttocks. This is usually around 20cm (8 inches) below your natural waistline, though it varies depending on your body proportions. To locate this area, feel for the widest part of your lower body, typically around the level of your buttocks. Wrap the measuring tape around this point, ensuring it stays level all the way around and sits snugly against your skin without being overly tight or loose. Check that the tape isn’t sliding up or down as you measure. Note the measurement in inches or centimeters, depending on what you need.
Leg (Inseam)
The leg measurement here refers to the inseam, which is key for determining the length of pants or similar garments. Start by standing straight with your feet slightly apart, about shoulder-width, to maintain a natural stance. Using a flexible measuring tape, measure from the top of your inside leg—right at the crotch, where your inner thighs meet—straight down to the floor. Hold the tape taut but not stretched, following the line of your leg. If you plan to wear the garment with heels, account for this by either wearing the heels during the measurement or adding their height (e.g., 2-3 inches or 5-7 cm, depending on the heel) to the total. For example, if your inseam to the floor is 30 inches and your heels are 2 inches high, your adjusted inseam would be 32 inches. Once you have your measurement, compare it to the inseam length listed for the product to ensure the fit will work for you. Record the result in inches or centimeters.
General Tips for Accurate Measurements
- Tools: Always use a flexible measuring tape (like the kind used for sewing) rather than a rigid ruler, as it conforms to your body’s curves.
- Assistance: If possible, have a friend or family member help you. They can ensure the tape stays level and positioned correctly, especially for hard-to-reach areas like the hips or bust.
- Clothing: Take measurements over thin clothing (e.g., a fitted t-shirt or leggings) or undergarments to avoid extra bulk, but never over thick layers like sweaters or jeans.
- Posture: Stand naturally with relaxed shoulders and even weight on both feet—don’t slouch or exaggerate your posture.
- Consistency: Use the same unit of measurement (inches or centimeters) for all parts to match the sizing system of the clothing you’re buying.